Floorboards
I spent some time thinking about the design of the floorboards. I mocked up the two options I was considering with some scrap wood.
The option on the left above is what the plans describe - the floorboards rest on the top edge of the bottom frame members and run as one piece from frame 1 to frame 5 (so the boards in the picture would be twice as long and extend to the front of the cockpit). This creates a flat floor from frame 1 forward, but raises the floor a few inches above the hull. It also raises the center of gravity a bit (the lower the weight in a boat the better). Another change I would make from the plans is to make the floorboards removable rather than screwing them to the frames.
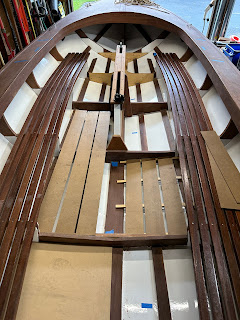
I decided on the design on the right side of the picture above - a separate flooring section between each pair of frames. There are five sections on each side of the keel for 10 panels total. Each panel is removable and is built like a small deck with the floor boards resting on cross members. It took some work to figure out the parts list so I could purchase the lumber.
The panels required about 34 board feet of Sapele, which I bought as 13’ x 9” boards. I had the lumber yard cut each board in two so I could bring them home inside the minivan rather than on the roof rack since it was pouring out. This is the lumber after I brought it home:
I cut the lumber into 4” x ~24” pieces for the floorboard slats (43 total pieces). The time I spent laying out the parts and making a cut list paid off because I had very little waste (I saved the scraps I did have to use as firewood next time I go camping).
Then I made the cross members which essentially serve as floor joists. Each of the 10 floor panels has four cross members, for a total of 40 individual parts. Each cross member is 3/4 x 3/4 inch square and about 20” long.
The cross members run athwartship and are notched to fit over the battens and angled on one end to rest on the keel. Every cross member was unique because the angle and location of the notches change so they were time consuming to make.
To cut the notches for the battens, I set the blade height on my table saw to 1/4” and made a series of cuts about 1/16” or so apart on a crosscut square.
I took my time assembling the panels to get everything as straight as I could. This is important because your eye can be a jerk - drive 99 screws in a perfect line but get just one a tiny bit out of line and your eye will immediately pick out that one screw and point it out to you.
I assembled the panels in the boat while sitting on the seats and using my feet to hold the pieces in place while fastening. I used masking tape to mark the locations of the cross members on the keel and battens to ensure the joists were parallel and evenly spaced. I then cut the floorboards for each section to length, notching around frame members as needed.
The floorboards are 4” wide with a 5/16” gap between boards. To position the first board, I measured 5/16” out from the keel (which is the same width as the floor board that will sit above it). I then measured and pre-drilled holes to countersink two screws into each floorboard at each joist (8 screws per floorboard, 32 per panel). I used a ruler to ensure the screws were in straight lines longitudinally and athwartship. Once I had the first board in a panel screwed in, the remaining three were much easier - I just used a temporary 5/16” block off wood as a spacer to hold the boards the right distance apart while I screwed the next board down.
My biggest problem at first was that I kept snapping the brass wood screws. I then got smart and started assembling the panels with stainless steel screws at first and then replacing them with brass screws one-by-one after everything was aligned. I used brass to save a little money because stainless steel or silicon bronze were much more expensive. The screws will be encapsulated in epoxy and won’t be under much load so I’m hoping brass will work.
The picture below shows an assembled panel. The two boards at the bottom of the picture have a 1/4” round over on the edges (all boards will eventually have rounded edges; I just took the picture before I did the top two boards).
The picture below shows the underside of the panels. You can see the notches for the battens in this picture.
The photo below shows the first pair of panels resting in the boat.
I built the rearmost panels first and worked my way forward, which turned out to be serendipitous because the panels get more difficult to build as you go forward due to the curve of the hull, which becomes more V-shaped towards the bow.
To get the floorboards in the front most section to fit, I had to twist them. This required steaming the boards. Luckily I bought a steam machine for the seats, so I just had to build a steam box - basically a wooden mostly airtight box.
After steaming the boards for an hour or so, I clamped them to the bench to twist them.
The photo below shows how the floorboards in the front section will twist to follow the hull as it becomes more V-shaped towards the bow.
I wanted the floor panels to be removable for cleaning and retrieving dropped items. I was originally planning on devising some kind of fastening system, but the panels fit tightly enough that I think they’ll stay in place (if this turns out not to be the case, I can devise some kind of hold downs later). The floor panels do rock a little bit because of the curvature of the hull, but I hope a few carefully placed shims will fix that.
It doesn’t look it in the above picture, but the floorboards in each section are aligned and the edges are straight.
I used my wood burner to label the underside of each floor panel so I know where they go if I remove them all. This was totally unnecessary, but I thought it was a nice detail.
I traced the outline of the boat with carbon paper and then used the wood burning pen to burn the lines freehand. The pen wanted to follow the grain in the wood so it was hard to draw a perfectly straight line. Making it look very freehand.After the two coats of up epoxy cured, I sanded everything with 220 grit in my handheld random orbital. It took over three hours to sand all ten floorboard sections, including some hand sanding to get between the boards.
Each floorboard is as wide as the keel and about as wide as the centerboard trunk so the floorboard sections on either side of the centerboard trunk fit up against the centerboard, but the sections behind and in front of the centerboard trunk need an extra board that sits on top of the keel. These just drop in and are notched on the bottom to sit on the centerboard frames. The small wood blocks that look kind of like ears on either end of the center pieces just keep it spaced evenly.
The screws are dummies and are only there to make these boards match the rest.I decided on Total Boat Gleam 2.0 varnish. The directions say 4-6 coats are required but fortunately no sanding is required between the coats which can be applied an hour apart.


Comments
Post a Comment