Varnishing the Brightwork
There is quite a bit of exposed Sapele woodwork in the cockpit, including the frames, centerboard trunk, seats, and floorboards, that also needs to be varnished for UV protection. I bought a gallon of TotalBoat Gleam 2.0 High Gloss, a one part varnish. Three coats of the Gleam can be applied in one day without sanding, which is good because the exposed wood will need needs 4-6 coats of varnish for UV protection. To make applying the varnish easier and neater, I used painters tape and plastic to protect all the painted surfaces so I don’t have to spend a lot of time cutting in and risk inevitably getting varnish on the white painted hull on every coat.
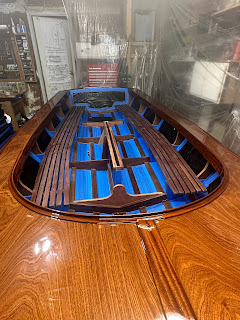
It took a long time (probably over 8 hours) to tape off everything, but it saved a lot of time overall because it made applying each of the 7 coats so much faster. The photo below is 6 coats of varnish on the interior framing (no varnish on the seats yet). I’m going to sand and apply one more coat for 7 total coats.
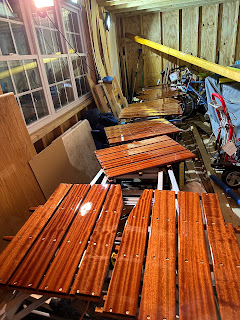
I varnished the floorboards at the same time as the interior frames. I made a makeshift workbench in the shed out of an extension ladder and saw horses which was just enough room to spread out all ten floorboard panels so I could varnish them all at once.
This allowed me to varnish the interior cockpit trim in the garage and then go out to the shed and varnish the floorboards. I did two coats a night for the first two nights then had to take a night off because it rained, and then applied the 5th and 6th coats. The TotalBoat Gleam flows out and self levels very nicely, was dry to the touch and can be recoated in about an hour, and doesn’t need sanding between coats so I really like it so far. Nevertheless, applying the varnish was tedious. You’re constantly on the lookout for drips or holidays (i.e. dry spots). I kind of dreaded applying each coat beforehand, but found it kind of relaxing in a zen wax on / wax off kind of way once I started (it might have been the fumes).
I let the last coat dry for a few days and then removed the tape. This was my first view of the “finished” boat - at least as far as varnishing and painting. There are more than a few drips, scratches, waves, bumps, dust specks, etc. (even a bug) in the finish but overall I love the way it turned out!
I left the tape below the rub rail because I still need to apply some 3M 5200 sealant (caulk) between the outer sheet and hull since it didn’t lay flat in a few places.


Comments
Post a Comment