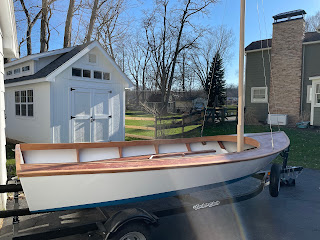
Posts

Varnishing the Brightwork

Image
There is quite a bit of exposed Sapele woodwork in the cockpit, including the frames, centerboard trunk, seats, and floorboards, that also needs to be varnished for UV protection. I bought a gallon of TotalBoat Gleam 2.0 High Gloss, a one part varnish. Three coats of the Gleam can be applied in one day without sanding, which is good because the exposed wood will need needs 4-6 coats of varnish for UV protection. To make applying the varnish easier and neater, I used painters tape and plastic to protect all the painted surfaces so I don’t have to spend a lot of time cutting in and risk inevitably getting varnish on the white painted hull on every coat. It took a long time (probably over 8 hours) to tape off everything, but it saved a lot of time overall because it made applying each of the 7 coats so much faster. The photo below is 6 coats of varnish on the interior framing (no varnish on the seats yet).  I’m going to sand and apply one more coat for 7 total coats. I varnished the floor

Varnishing the Deck

Image
When I left off last season, I had put the fiberglass on the deck but ran out of warm weather before I could put on the epoxy filler coats to hide and protect the weave in the fiberglass cloth and leave a nice smooth surface for varnishing. Fiberglass normally takes two or three coats of epoxy and some sanding to get a smooth glass-like finish. I started with a sealer coat before installing the fiberglass cloth so the wood doesn’t absorb all the epoxy, followed by a coat to wet out the fiberglass cloth and bind it to the wood. The weave of the glass cloth is still visible after wetting it out as shown above, so one or two epoxy filler coats is required to make it smooth.  I wet out the glass in the fall and did the filler coats in the spring.  Using a foam roller, one coat mostly filled the weave. I then touched up any low spots with a chip brush.  Photo below is the deck after rolling on the filler coat, before sanding. It’s always tough to take a sander to the fresh and shiny epoxy,

Trim and some rigging and fittings

Image
I’m nearing the home stretch, which involves a lot of small tasks. Many of these tasks are just for appearances. For example, I wasn’t careful enough when painting the gussets on frame 5 so they looked kind of sloppy and were bothering me. A small piece of scrap wood epoxied in place cleaned it up nicely though.   The centerboard trunk also needed a cap.  The cap needs at least one opening for the centerboard lines to pass through to use to raise and lower the centerboard. I also cut a good size opening in the aft end of the cap so I could see the centerboard to check it’s height and unstick it if necessary.  I’m also going to attach the centerboard cap with screws but no epoxy so it is removable if I need more access to the centerboard.   The tiller is made out of Sapele too.  I had to deviate from the plans a little bit and added a second layer of wood on the bottom of the tiller so I could lower the hole for the pivot bolt to raise the tiller and prevent it from rubbing on the top o

Floorboards

Image
I spent some time thinking about the design of the floorboards. I mocked up the two options I was considering with some scrap wood. The option on the left above is what the plans describe - the floorboards rest on the top edge of the bottom frame members and run as one piece from frame 1 to frame 5 (so the boards in the picture would  be twice as long and extend to the front of the cockpit). This creates a flat floor from frame 1 forward, but raises the floor a few inches above the hull. It also raises the center of gravity a bit (the lower the weight in a boat the better). Another change I would make from the plans is to make the floorboards removable rather than screwing them to the frames. I decided on the design on the right side of the picture above - a separate flooring section between each pair of frames. There are five sections on each side of the keel for 10 panels total.  Each panel is removable and is built like a small deck with the floor boards resting on cross members. It

Stepping the mast

Image
Stepping the mast means raising it and securing it in place with the steel cables that act as guy wires to support the mast.  Hopefully I will get good at this because this boat is trailered so the mast will need to be raised and lowered every time it is sailed.     The steel cables and hardware that hold the mast up are called the standing rigging (because you don’t adjust them while sailing the boat).  The standing rigging on this boat consists of one cable on the front (the forestay) and a cable on each side (the shrouds).  Larger boats will have more cables to support the mast, but the Glen-L 15 only has the three.  The standing rigging will be under a lot of stress, so it must be solidly attached to the boat.  The shrouds attach to chain plates (shown below) that are bolted to the hull and frame, with steel covers where they pass through the deck. The forestay attaches to the bow plate, which is bolted to the deck and stem. This is what the chain plate looks like from below (viewe

Building the spars

Image
The spars are the wooden “poles” that hold up the sails and consist of two pieces: the mast (the tall upright post) and the boom (the horizontal member that attaches to the mast and swings to control the angle of the main sail).    The mast is made from a 22’ long piece of 3” x 4” Sitka spruce. It is tear drop shaped in cross section and tapered getting narrower at the top, so I will have to shape it out of a rectangular board. Sitka spruce was hard to find.  The only place I could find it was a boat building store near Toronto, Noah’s Marine, which is about a three hour drive and in a different country.  Luckily I had to drive to Toronto anyway so I stopped on the way. Even then, I couldn’t find a piece big enough to make the mast out of one piece (which I expected), so I had to make it out of several pieces. I bought 6 boards each about 1” thick by 4” wide by 12’ long, which I spliced in pairs to make three 22’ long lengths that I’ll stack and glue to make a single 3” x 4” x 22’ long