Stepping the mast
Stepping the mast means raising it and securing it in place with the steel cables that act as guy wires to support the mast. Hopefully I will get good at this because this boat is trailered so the mast will need to be raised and lowered every time it is sailed.

The steel cables and hardware that hold the mast up are called the standing rigging (because you don’t adjust them while sailing the boat). The standing rigging on this boat consists of one cable on the front (the forestay) and a cable on each side (the shrouds). Larger boats will have more cables to support the mast, but the Glen-L 15 only has the three. The standing rigging will be under a lot of stress, so it must be solidly attached to the boat. The shrouds attach to chain plates (shown below) that are bolted to the hull and frame, with steel covers where they pass through the deck. The forestay attaches to the bow plate, which is bolted to the deck and stem.

This is what the chain plate looks like from below (viewed from under the deck) to show how it is attached to the hull and frame.

This is the bow plate. The forestay and jib attach to the bow plate.

The base of the mast fits into a socket on the keel. The socket is called the mast step (hence the term “stepping the mast” for raising it) and is just a big block of wood with a rectangular hole that the mast fits into, shown below before finishing. It will be securely attached to the keel and frame with epoxy and screws. I cut drain channels in the bottom of the mast step before installing it so any water that gets in the socket will have a place to drain.

Once everything is setup, stepping the mast will involve raising it to vertical, inserting the base of the mast into the mast step, and attaching the shrouds and forestay. First, as a one time setup, I had to figure out where the forestay and shrouds attach to the mast and install the mast tangs, which are just steel tabs attached to the mast that the clevises at the ends of the shrouds and forestay attach to. The tangs have to be at the right height on the mast to ensure the shrouds are taught and the mast tilts backwards at the angle given in the plans.
To get the mast tangs at the correct height, I made temporary adjustable plywood collars and used trial and error to adjust them up and down until I found the right height. This required raising and lowering the mast ten times, fortunately I had a few patient friends helping.

The photo above shows the temporary plywood collars with clamps to hold them in position. The photo also shows the forestay (rightmost cable) and the shrouds, plus a temporary extra string with a plumb bob on the end. Gravity and the plumb bob ensure the temporary string is vertical, which allowed me to measure how far the mast tilts back. The plans said the top of the mast should be 6” behind the base, so I drew a line at that position and adjusted the forestay position until the mast was at the right angle.

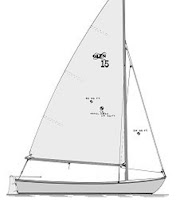
This is what the boat looks like with the mast stepped. Next step is to raise the main sail so I can figure out where to attach the boom to the mast.


Comments
Post a Comment