Fitting the frame
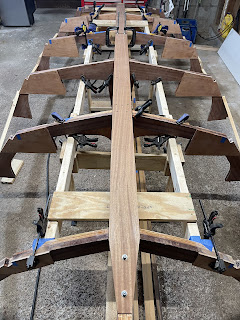
The picture below is a test fit to check that the frames are aligned so the hull will have nice smooth curves. The photo shows the keel temporarily clamped in place and scrap 3/16” cedar strips (leftover from a cedar strip canoe I built) for temporary chine logs and sheer clamps. The cedar strips bent very easily. The real chine logs will be 3/4”x2” Sapele which I’m afraid might be a challenge to bend.
Finding 16’ lumber for the keel and other longitudinals was difficult. Most boards are about 8’-12’long. I got lucky and found a 16’ board that was about a foot wide and 1-1/8” thick, which I named boardzilla after I strapped it to the roof.
The board has a bit of a warp on one side, but I think I can work around it.
Boardzilla was too big to wrestle through the table saw so I put it on a pair of sawhorses and rough cut the 4”x12’ keel from the straightest part of the board with a skilsaw and then ran that through the table saw to clean it up. The board was unsurfaced, so both sides were very rough initially, but that’s okay because I have to plane it down from 1-1/8” to 3/4”, which will clean it up nicely.
The thickness planer is an awesome tool. The above shows the same piece of wood (the keel) before and after planing.
After I cut the keel to final size, including tapering the tip into the stem, I trimmed the notches in each frame using a chisel and file so the keel sat solidly with no gaps, then I temporarily attached it to the frames and bed logs with screws. Temporary because this is just a dry fit; everything will have to be taken apart and epoxied for final assembly.
The front of the keel is attached to the stem with 1/4” bolts. I couldn’t find 7” long bolts so I am temporarily using threaded rod while the bolts come in.
I also installed temporary braces between each frame to make sure they are plumb and that they stay aligned when I bend the chine logs and sheer clamps.


Comments
Post a Comment